I previously reviewed my favorite
Thermos insulated stainless steel travel tumblers, which I use to keep my tea warm all day long. I still use them every day
for my tea, but I find that having to disassemble the lids to clean them
thoroughly after drinking hot cocoa, coffee with cream, or other hot drinks
that leave a residue is cumbersome.
For that reason, I had been drinking my hot cocoa, etc., in ceramic mugs.
Unfortunately, since I like to sip rather than gulp my hot beverages, regular
mugs don't keep my drinks hot long enough. By the time I was halfway through
my drink, it usually had become tepid.
I liked the insulated stainless steel mug that my husband uses to keep his
coffee hot, but the slide-open lid needs to be disassembled for cleaning and
isn't dishwasher safe.
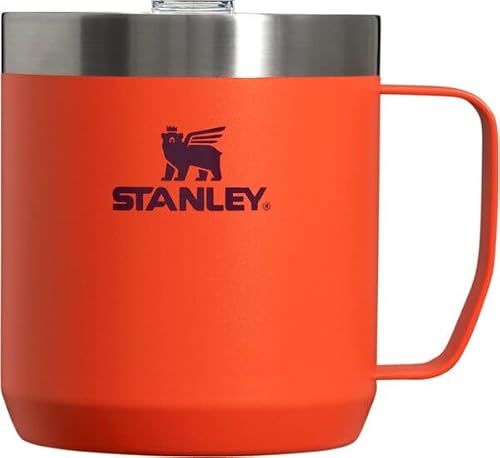
Finally, I found a good solution: The Stanley Classic Legendary Camp Mug, a
dishwasher-safe, insulated, stainless steel mug with a lid that has an opening
for sipping.
While the Stanley Classic Legendary Camp Mug has long been a staple for
outdoor enthusiasts, its versatility extends far beyond outdoor use. In this
product review, I'll share why the Stanley Classic Legendary Camp Mug is not
just for camping but also perfect for home use, keeping your daily coffee,
tea, or cocoa hot longer than ceramic or china mugs.
Stanley Classic Legendary Camp Mug Features and Benefits
Design and Durability
True to its name, the Stanley Classic Legendary Camp Mug embodies timeless
design and unmatched durability. Crafted from rugged stainless steel and
featuring double-wall vacuum insulation, this mug keeps your favorite hot
beverages at their optimal temperature for a long time. Whether it's a brisk
morning coffee or a relaxing evening tea, the Stanley Classic Legendary Camp
Mug ensures that every sip is as enjoyable as the last.
Its durable stainless steel construction makes it a great choice for enjoying
a hot beverage on a deck, patio, or outdoor space without fear of breakage.
Although it doesn't keep drinks as hot as mugs that have completely closed
lids, this insulated stainless steel keeps beverages hot much longer than a
conventional ceramic mug. I also love that it can be used one-handed because
the lid doesn't have to be removed or slid open and closed.

|
|
I love how the lid has a tab handle that makes it a cinch to press on
and lift off.
|
Comfort and Ergonomics
The Stanley Classic Legendary Camp Mug offers style and comfort in equal measure. Designed with ergonomics in mind, this mug features a sturdy handle that provides
a secure grip for effortless sipping. The wide mouth opening in
the lid makes it easy to drink from and clean, while the smooth lip ensures a
pleasant drinking experience with every sip.

|
|
The opening is wide enough to enable easy sipping but also small
enough to prevent hot drinks from cooling prematurely.
|
Versatility and Adaptability
While the Stanley Classic Legendary Camp Mug is built for the great outdoors,
its versatility makes it a perfect fit for any home setting. Its sleek,
classic design, rugged construction, and choice of colors make it an
attractive and useful accessory for your kitchen, desk, or coffee table.
Whether you're starting your day with a caffeine boost, warming up with some
hot cocoa, or winding down with a soothing cup of tea, this mug accommodates
your preferred hot beverages.
I chose the 12-ounce mug, but it also comes in a tall 24-ounce mug option.
Ease of Cleaning
Cleaning the Stanley Classic Legendary Camp Mug is a breeze, thanks to its
durable stainless steel construction and secure press-fit Tritan Drink-Thru
Lid.

|
|
The press-fit lid is all one piece so there's nothing to disassemble
and no tiny crevices, so it's easy to clean. The tab handle makes it easy
to lift out for washing. In addition, both the stainless steel mug and the lid are
dishwasher safe in case you don't want to hand wash them.
|
Whether you choose to hand wash or use a dishwasher, keeping this insulated
mug clean is quick and hassle-free, ensuring that it remains in pristine
condition for years to come. I use our
OXO bottle brush for
both the lid and the mug since I prefer to hand wash them.
Makes a Great Gift
The
Stanley Classic Legendary Camp Mug
is more than just a camping essential—it's a versatile and indispensable
accessory for any home, thanks to its timeless design, excellent durability,
and easy cleaning requirements. It would make a much-appreciated gift for
someone who enjoys camping as well as anyone who likes to sip on a hot drink
any time of day.
This mug is available in a wide range of colors to suit any taste.
Some colors are available only in the 12-ounce model, others only in the
24-ounce model, and others in both sizes. I chose a metallic rose gold shade
called Rose Quartz Glow. Here are just some of the color options.
Savoring a hot beverage is one of life's simple pleasures. Enhance the
experience with the Stanley Classic Legendary Camp Mug.
The Best Easy-to-Clean Insulated Stainless Steel Mug for Hot Drinks by Margaret Schindel
Read More
Product Reviews by Our Review This Reviews Contributors
Read More
Gift Reviews by Our Review This Reviews Contributors
Note: The author may receive a commission from purchases made using links found in this article. “As an Amazon Associate, Ebay (EPN) and/or Esty (Awin) Affiliate, I (we) earn from qualifying purchases.”


.png)